Gateway 21

Gateway 21 was exhibited at Gomboc Gallery Sculpture Survey, Perth, Western Australia, in 2012.


Now it has a home in my garden.
It is made from wheel thrown stoneware clay, and glazed with 2 superimposed glazes to create dynamic surface. At a first glance, many people think it is made from shells.
early stages
It all started with teaching ceramics to Diploma of Environmental Art students at Midland polytechnic. As a part of their course, students participate every year in Sculpture Survey at GombocGallery.
Lots of pressure and great learning experience for emerging artists.
As a new lecturer to a small group of students I decided to practice as well as preach and make a ceramic sculpture for the survey too.
Theme: “New Perspective”
The idea of the arch emerged very early on. Sculpture had to be relatively large to assert itself in the open outdoor space and I wanted people to be able to connect and interact with the sculpture, space and idea.
Looking at the arch, through arch, physically walking through and emerging on the other side (same or changed?). In my mind it fitted the theme perfectly.
As a ceramist I am not a stranger to arches.
When I was a student, one of the lecturers introduced me to the Catenary arch. The one that hanging chain assumes under its own weight when supported only at its ends. It is a beautiful mathematical curve, with lots of complex equations... but can be drawn simply and accurately by hanging a chain from 2 nails and drawing the curve it creates.

Catenary arches are often used in the construction of kilns.

And absolutely beautiful when found in nature:

So I knew I wanted to make an arch. Catenary arch.
One of the concept drawings:

making
Unfortunately, I can't find photos of the early stages of design process, so I can give you only words.
Next came a small 3D paper model.
Then full size paper model (every part of small model enlarged on photocopier and put together)
After that all parts were cut out of 3mm mdf to make outer frame, + 10cm narrower version to make inner frame.
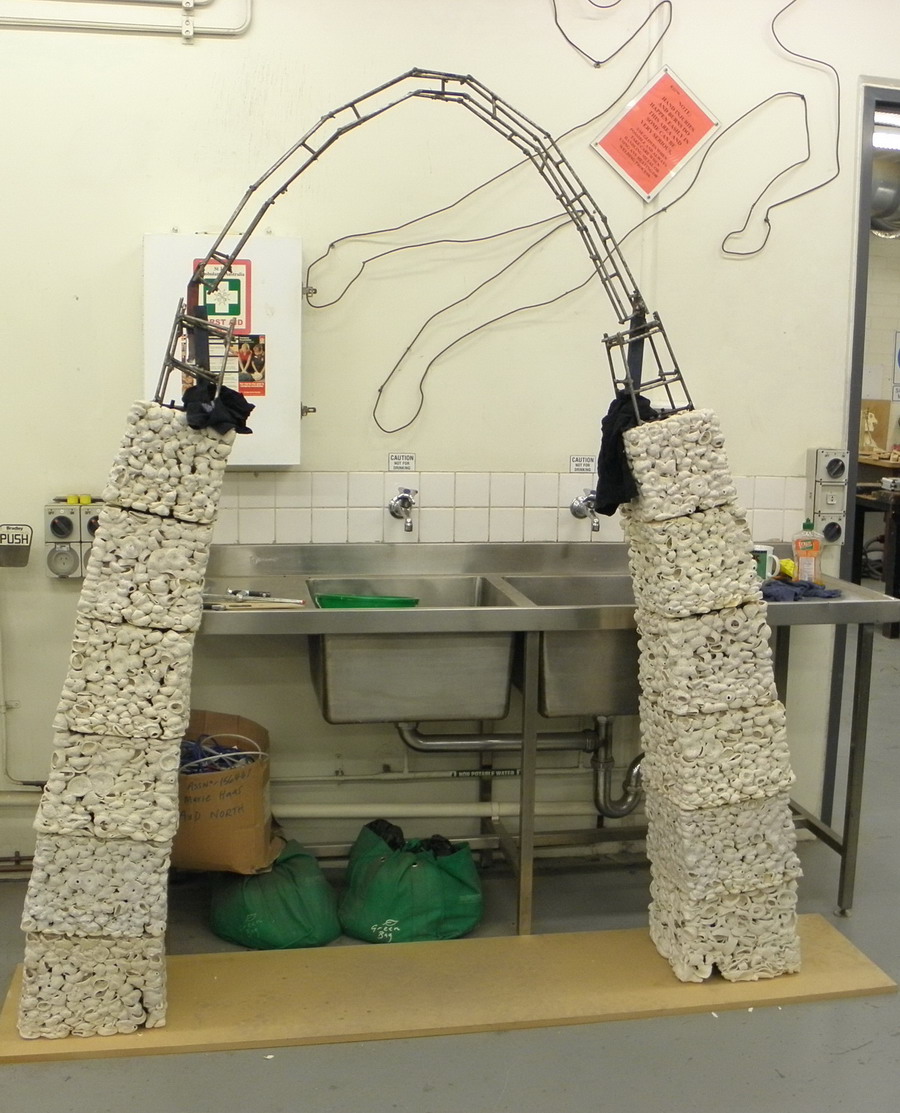
MDF frame was used to hold clay shapes.
Here you can see stack of 3 blocks to the left, and one block on the right. Hopefully you can imagine MDF framework into which the wheel thrown bits were placed (well, thrown).

Arch is made of 21 blocks, and each block is made of hundreds wheel thrown little bits:


And then, of course, few blocks (first ones I made) had to be made again as they were not dense enough and developed big stress cracks in the glaze firing.
But finally, they were all made, bisque fired to 1000o C, glazed with 2 glazes and fired to 1200o C (cone 6).
After all that I could start thinking about the assembly in more detail.
assembly
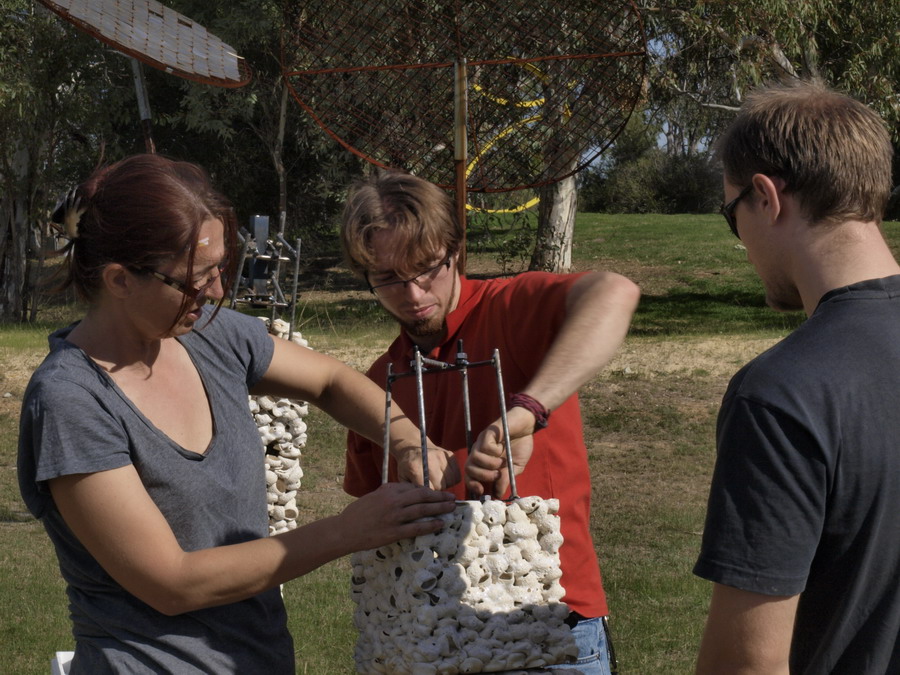
After lots of consideration, toying with various options and consultations with Charlie - wonderful technician at Central Institute of Technology - we decided that the best option for assembly is to make steel rod frames for each block.


Most of the welding was done inside ceramic blocks. That assured perfect fit and ceramic can withstand the heat. (and yes, I have done the welding)
It is a really neat system. Metal frames slide in and out of the middle of ceramic blocks. Because of rhomboid shape bigger on the bottom and smaller on the top, they don't fall out.
Nuts and bolts allow for adjustment and tightening. And the whole thing can be pulled apart and re-assembled.
Absolutely essential: to mark each piece exactly how it fits together - including which block is on the left and which on the right side of the arch, and which side faces in. And same for the metal frames.
That system worked on the bottom seven blocks on each side. Block 8 was too small to weld inside it, and even if I managed that, it would be impossible to reach the nuts & bolts
while assembling.
while assembling.
So the plan was for the top 7 blocks to be "threaded" on the metal frame and lowered onto the "legs" of the arch. Charlie ( on the photo below) welded larger square tube on the seventh frame, and smaller ( perfect size to slide into one another) onto the top arch frame.

After we made sure the metal bits all fit together, it was time to trial assemble the whole thing together.
Charlie was worried about ceramic blocks on the arch part, so he came up with the plan:


There were a few hair-raising moments there! But YES! It fits!
Now we only have to repeat all that on site. Without forklift.
installation
First step was to dig 2 holes for the foundations. I made couple of steel rod frames (same system as inside the ceramic blocks) to be concreted under ground level.

They had to be level and perfectly positioned, or the arch would not connect at the top. Big board you see in the foreground of the photo is a template, assuring that perfect fit.

This part we practiced before and it worked really well.

This is another template, to make sure the top part of the arch will fit - before we start maneuvering it in place.

There are no photos of the next part - we were too busy with all hands holding the heavy frame supporting the ceramic blocks threaded on the metal frame.
The top fitted perfectly and the only thing left to do was to unscrew the MDF frame supporting it.
That is when we realized that the screwdriver head on the battery drill does not fit the screws.
No matter how much we tried, we still did not prepare for everything. The rest of that story is part of a legend now.
Finally, done:


And my favorite photos with my son Robert:


Good. Very Good
ReplyDelete