Friday, 3 October 2014
New challenge
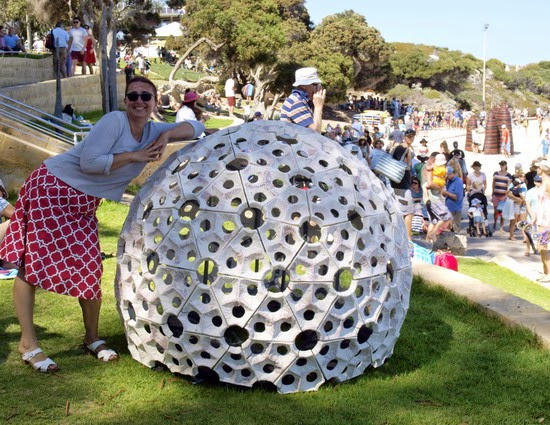
Here & Now 14 has ended and Shape of Thought has been taken apart to transport back to the studio.
For some time now I have been pondering how to improve the design, and the obvious conclusion is to replace the brackets with the sturdier, welded construction.
I have even done a welding for sculptors workshop in anticipation of the next challenge.
The next sculpture will be based on the geodesic dome again...I feel that I have just started exploring the structure and I still have a long way to go. Well, at least this time the starting point is a bit further down the path, in comparison to the Shape of Thought.
I need to begin by considering the welded frame first, as that will influence the shape of ceramic triangles.
First, let's look at the geodesic sphere again:

What is not immediately obvious is the angle between the 2 triangles, and that angle complicates my construction. It is a bit clearer on those drawings:

If I decided to make a typical geodesic dome framework (which follows the edge of the triangle lines), using the metal flats instead of rods so that I can attach ceramic pieces to them, I would have to weld ( or bend) each flat to have the angle shown on the lower drawing (left).
Bending would be impossible on the lengths I require, and welding impractical.
On the Shape of thought, if you remember, I have used brackets instead. It looked good, but did not provide any structural strength:

This time, the idea is to use steel flats instead of brackets, welded together into some sort of a net, to which I will be able to bolt ceramic pieces in similar fashion to the work on the photo.
Instead of scanning pages and pages of sketches to illustrate the thinking process, I will present you with the 3 finalists:

Let's see what they look like connected together. Black lines represent steel flats:

Which one is the best for my purpose?
Tuesday, 7 October 2014
Options, alternatives and preferences
For aesthetic purposes, I favour "Y" shape for the steel frame. It will be possibly more difficult to construct than "T" shape ( more welding), but it's symmetry makes a good base for the ceramic triangle.
Ah, the triangle.......fun is in the coming up with many options....

and than choosing the right one....


This is approximately what it would look like:

Maybe I should make it slightly larger than the last one.....
Wednesday, 19 November 2014
Mould making
I have been absent for a while, recharging my batteries in New Zealand. It was my first visit and I think I'm in love...everything was so green and beautiful. My inspiration folder is full of images of rocks, plants and textures.
But now that I am back in the studio, it's time to begin prototyping new triangular modules.
I have done the maths, drawn the triangles the size I want to make them and cut them out of the stiff paper. I have found out that the good quality watercolour paper works well for this purpose as it can withstand getting wet on clay multiple times.
My husband made interlocking wooden frames, already cut on the 7 degrees angle so my clay triangle will be larger on the top and smaller on the bottom:

At first I thought that I will hand-build each triangle within the frame

but when I realized that making the first one took close to 2 hours I decided to make a plaster mould.
I also decided to keep wooden frame as part of the mould as it takes care nicely of the 7 degrees angle which would create undercut in a one piece plaster mould.
This is the "lazy mould maker's" way of making the framework for pouring plaster:


And here it is, plaster poured. It will be ready for removal of framework in an hour or so...
Sunday, 23 November 2014
Naming
Just as I would not name a baby before it is born, I usually don't name my work before it is finished. The reasons are simple ( in the case of my work, not necessarily applicable to babies): during the making process I like to leave the options open for the piece to evolve and change. Sometimes the piece doesn't change much, but my understanding of it does as I research, think about it and make it...and therefore the name reflects that new perspective and understanding.
This sculpture is different.
It started its virtual existence as a proposal to the Sculpture by the Sea 2015 at Cottesloe, Perth. The proposal had to be very detailed and include concept drawings, sizes, colours, weight and the title, among the other things.
To my absolute delight and amazement the proposal has been accepted, subject to safety requirements.
The letter I have received stating the deadlines has given me a gentle push in the right direction.... And so the making has begun.
Oh, you would like to know the name? I'm not sure I should tell you, after all, it has not been made yet ( yes, I almost said "born")
well, all right...
It is called:
Intuitive Sense of Connection
As usual, you will be able to follow its progress here, and I hope that you get to see it at Cottesloe next year.
Monday, 1 December 2014
Making
The mould turned out well, and so the making has begun:


This one looks nice:

I also tested them on the spare triangles:

And I have narrowed them down to these two:


I really like the lichen effect of this glaze. One of my favourites!

Dipped:

Diluted with more water and dipped:


Here I have brushed the Dry Plum glaze, and dipped Crawl:


Wednesday, 10 December 2014
Glaze tests
As the number of triangles grows and invades the studio,my mind is turning to glaze choices. I am limited by my description in the brief stating that the sculpture will be white and off white - too late to change my mind now, even if I wanted to.
My plan is to have coloured underglaze and white textural glaze on top.
Here are the first tests before the firing:
and after the firing:
Which one will be the winner? Wet or dry version of the crawl glaze?? Green or pink background? Or both?
Tuesday, 16 December 2014
More about glazes
I find that clay people are quite polarized on the subject of glazes. Some love the chemistry, science and experimentation of glaze making, and others stay away from it as far as possible. Me, being the curious one, can happily spend weeks mixing and testing glazes just to see what happens,and documented tests are running into several thousands by now.
In my students days I got interested in superimposing glazes ( applying one on top of another). Most literature at the time ( and I'm not sure if that has changed) implied that if you understand the chemical composition of the glaze you can predict the way it looks. Well, that is true...to an extent. There are many more variables, which make it interesting, and ( just the touch) unpredictable... If the chemical composition of the materials was the only relevant data, you would expect that a piece with glaze "A" on top of glaze "B" looks the same as glaze "B" on top of glaze "A". After all, it all melts together. I was quite thrilled to discover that they can look quite distinctly different and thus the testing monster was created.
Couple of years ago I used a bubbly glaze on the "Gateway 21". The effect was created by applying a Crawl glaze on top of the Crater ( or Lava) glaze that I tested years ago:

I tried to recreate it last year for the "Shape of Thought", but something has changed and the result was quite different. Is the change in supplier of one of the ingredients the culprit? (That is why some of the glaze recipes don't travel well between the continents).
I thought that I should give it another go, with the same disappointing results.
First tile is original Crater glaze with crawl glaze on top. Second tile is Crater glaze with additional 4% of Silicon Carbide, and third tile is new Crater glaze with Crawl glaze on top. Yes, more bubbly, but very different from the original.
Crater glaze generally contains Silicon Carbide, and crawl glaze "secret ingredient" is light Magnesium Carbonate. I have not come across glaze that combines both materials together, so I thought to give it a go:
Andrea's Fizz glaze:
Magnesium Carbonate light 25%
Nepheline Syenite 66%
Ball Clay 5%
Silicon Carbide 4%
Result is on top right, with "Fizz" on top of various dry glazes and slips on the other 3 tiles:
Here are the close ups of tests with 2 different Crawl glazes on top of the same dry glazes. I have not tested the Crawl 1 by itself as that is the glaze used on "Shape of Thought".
I really like the lichen effect of this glaze. One of my favourites!
Tuesday, 23 December 2014
Test, test and test again
Sometimes I think painters have it easy. They can mix the colours on a palette, test them on the edge of the paper and immediately know what they look like. I know, I'm (slightly) oversimplifying. For us, testing means starting from the raw ingredients, recipes and good set of scales, sieve and a dust mask. First set of tests are done on small tiles or bits of broken bisque fired shards and selected glazes are then tested on larger surfaces.
This is kind of tertiary testing.... I have sprayed Dry Plum glaze and Copper slip on some triangles and brushed or dipped the Crawl glaze on top.
Brushed:
I didn't like the combination of green and dirty pink, so decided to go with pink only. Another test firing.... We are getting closer now.... This one has got only a hint of pink on the ridge ( I have sprayed the Dry Plum glaze, and dipped Crawl):
Here I have brushed the Dry Plum glaze, and dipped Crawl:
And we have a winner.....
Just as well I like it, as I have glazed the full kiln load with the assumption that I would.
On the down side, about half of the bigger triangles in the kiln have cracked in the glaze firing. No idea why...
Thursday, 22 January 2015
Metal construction
As the triangles making is nearing end, it is time to face another challenge...metal framework to hold it together. Now I am venturing into uncharted waters and this is the real point of departure from the previous sculpture.
The idea is to have each triangle bolted to a Y shaped metal, and Y shapes connected with the bracket bent to 14 o to create the sphere.

It looks easy on the paper, but it is full of challenges in the real life.
I have been working on it for at least couple of weeks now...
First job was to cut components for the Y shapes, drill holes for the bolts and weld them to form Y. I'm using 25 x 3 mm mild steel.
In order to create 135 Y, I had to cut 540 bits of metal in 6 different sizes, drill 405 holes and then weld them together.
And approximately 250 brackets, bent to 14 o

I am a novice welder, but an excited one, and now a proud owner of a Mig welding machine.
(Isn't that a wonderful Christmas present for a girl!)
Here are my first efforts with my own welder, with the bracket positioned between the two triangles:
So far, it is all working to plan. Of course I made a template (jig) to weld on, to assure that all holes are exactly where they should be to fit the ceramic. I measured it directly from the finished ceramic pieces (as the clay shrinks in drying and firing it was much safer and more accurate to do it that way).
To tell the truth, my husband made the jigs as he has so much more patience for those things that I do, and I'm very grateful.
Welding the Y shapes into clusters to create hexagons and pentagons is much more difficult as it is not welding on a flat surface. There are those 14 o brackets in between complicating everything.
The solution was to purchase laser cut metal triangles and weld them together to form a welding template.
I'm not sure if I can explain it clearly, but pictures should help. Those metal triangles are beautiful in themselves. Here they are ready to be welded together, to create a welding jig.
It took hours to position them to get to this point.
Y shapes bolted to the jig, with brackets welded in between:
Finished hexagon:
I have to make 15 hexagons and 6 pentagons. The scope of the project is becoming scarily big the further I travel...
Tuesday, 27 January 2015
Framework, structure, skeleton
The past week has been very demanding - both physically, as the welding become increasingly difficult and hard to reach; and mentally and emotionally, as the uncertainties are growing. Will it all fit together? What if I have miscalculated the sizes, the shapes, the angles??
Steel flats that seemed so strong and un-bendable before I started, now seem too thin and weak to hold ceramics. I am discovering that metal is a soft material ( comparing to ceramics) if you have the right tools.
And I have to push on to find the answers: will it work?
Taking shape:


Main structure is completed. It is quite flexible and not really rigid. It is also not flat on the ground when turned over (one foot in 3 reaches the ground). I knew it wouldn't be, but now is the time to deal with it....

structure, lines and shadows:


Working on the base; it needs to be stable and sturdy. If you look carefully, you can see a metal pole in the center reaching from the top to the base. There will be another three before it is finished.

When I was a student, I was ( as most ceramics students I know) intrigued with combining ceramics with other materials. But never, in my wildest dreams I thought that I would be combining with metal, in such a way.
As I stand back and look at the complex angles forming the shape, I am pleased. All the hexagons and pentagons are coming together nicely. Base could of been more elegant, perhaps, but I am concerned with safety and stability...
It is done.
This week, forecast is for the temperatures between 35 - 39 degrees Celsius. (overnight minimum of 24)
Today we have reached 40 degrees, and I am happy that the welding is done.
Steel flats that seemed so strong and un-bendable before I started, now seem too thin and weak to hold ceramics. I am discovering that metal is a soft material ( comparing to ceramics) if you have the right tools.
And I have to push on to find the answers: will it work?
Taking shape:
Main structure is completed. It is quite flexible and not really rigid. It is also not flat on the ground when turned over (one foot in 3 reaches the ground). I knew it wouldn't be, but now is the time to deal with it....
structure, lines and shadows:
It fits, it fits!!
Working on the base; it needs to be stable and sturdy. If you look carefully, you can see a metal pole in the center reaching from the top to the base. There will be another three before it is finished.
When I was a student, I was ( as most ceramics students I know) intrigued with combining ceramics with other materials. But never, in my wildest dreams I thought that I would be combining with metal, in such a way.
As I stand back and look at the complex angles forming the shape, I am pleased. All the hexagons and pentagons are coming together nicely. Base could of been more elegant, perhaps, but I am concerned with safety and stability...
It is done.
This week, forecast is for the temperatures between 35 - 39 degrees Celsius. (overnight minimum of 24)
Today we have reached 40 degrees, and I am happy that the welding is done.
Saturday, 7 February 2015
In the contemplative mood
If you remember the post about "testing" all the way back in December, You might remember me mentioning that about the half of the bigger triangles have cracked in the glaze kiln. I have no explanation. Pieces were on different positions in the kiln,on different thickness shelves, cracks are on different positions on the triangles. The only thing the same is that they are all on the bigger size triangles, the one which has almost equal sides ( but not quite).
I have "lost" another 50% in the second glaze firing. If it continues that way, instead of making 90 triangles "A" I will have to make almost 180. Not acceptable.
I remember attending a workshop by UK potter Peter Hayes, about a decade ago if not more... I thought of him now, as at the time he was making large raku fired work, broken to segments and glued together with red resin. I have also researched repair methods and Kintsugi .“The term “kintsugi” means ‘golden joinery’ in Japanese and refers to the art of fixing broken ceramics with a lacquer resin made to look like solid gold” (….and often actually using genuine gold powder in the resin).Some contend that many Japanese have come to cherish the imperfection of a broken pot repaired in this way….seeing it as a creative addition and/or re-birth to the pot’s life story. Others say that when something has suffered damage and has a history, it becomes more beautiful.
Lakeside Pottery has an excellent web site on restoring broken pottery ( among other goodies), and I decided to give it a go....with red resin.
The result was quite surprising... Not so much visually, but how it changed the interpretation of the work (as tested on the family members).
While before everyone saw pieces as vaguely organic, those with red resin look hurt. They actually invoke empathy from viewers. Sense of exposed flesh, but luckily, no gore and oozing blood....
I like it, but do I dare incorporate it in the work?
To be on the safe side, I explored (first in Photoshop, and than on real pieces) some other options. I thought that clear resin might have a chance,but it looks like glueing gone wrong.
Red on the other hand has impact. With it's slightly waxy surface it looks strangely fleshy.
Intuitive Sense of Connection is reaching out to connect on the "flesh and blood" level.
Monday, 2 March 2015
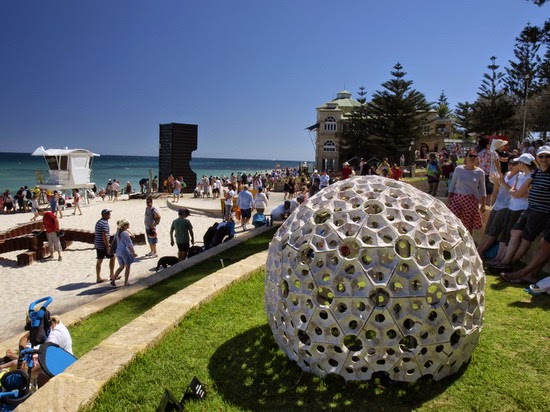
SCULPTURE BY THE SEA, Cottesloe 2015
Tomorrow I am assembling The Intuitive Sense of Connection at Cottesloe. It is exciting and terrifying.
The exhibition opens on Friday 6th March and I hope that you will be able to see it!

Tomorrow I am assembling The Intuitive Sense of Connection at Cottesloe. It is exciting and terrifying.
The exhibition opens on Friday 6th March and I hope that you will be able to see it!
11TH ANNUAL COTTESLOE EXHIBITION
Sculpture by the Sea returns to Cottesloe Beach, Perth, Western Australia. 70 local, interstate and international artists will transform Perth's most popular beach into a stunning sculpture park overlooking the Indian Ocean with some of the most glorious sunsets of any major city in the world. It's one of the world's largest free to the public events.!
When |
6 - 23 March 2015
| |
Where
| ||
Web site
| ||
Education kit
|
Wednesday, 4 March 2015
Assembly
The big day has arrived. Packed up and ready to go:

It was so busy and exciting that I forgot to take photos! thanks to my friend Steph who was a fantastic helper on the day, here is one:

finished:

And here it is, ready to be "signed off" by Sculpture by the Sea crew:

I am mildly sun burned, exhausted, but happy and proud. It looks good!
The big day has arrived. Packed up and ready to go:
I am mildly sun burned, exhausted, but happy and proud. It looks good!
Monday, 9 March 2015


Friday, 27 March 2015
It is all over, would I do it again?
Making The Intuitive Sense of Connection had some very challenging moments. I almost gave up. I felt excited, elated but also fragile, insecure and stretched to the limits.
Now that I am rested, I am glad of the road that I have traveled, and the journey still ahead. One thing is certain: I would not have the strength without the support of the family and friends and the positive energy from the visitors at Cottesloe. it is inspiring!
Today this is all that is left at Cottesloe, and soon it will dissapear all together:

I am lucky to have beautiful friends, who are sending me special, irreplaceable photos. Sense of Connection indeed!

 Thank you!
Now that I am rested, I am glad of the road that I have traveled, and the journey still ahead. One thing is certain: I would not have the strength without the support of the family and friends and the positive energy from the visitors at Cottesloe. it is inspiring!
Today this is all that is left at Cottesloe, and soon it will dissapear all together:
Sunday, 28 June 2015
Intuitive Sense of Connection went to the ball....
and it looked good with the disco lights on at the Astral, Crown Perth for the Artitude 2015
Set up:


On the night:


Set up:


On the night:


Wednesday, 21 October 2015
Intuitive Sense of Connection at Bondi
Arriving to the Bondi beach with a taxi straight from the airport at 9 am, we saw the truck with sculptures just arriving. How exciting!!! If you look really closely, you can see the skeleton of Intuitive Sense of Connection at the front of the truck.

This is the spot where it is going:

Several hours later, boxes with the ceramic are lowered by crane:

That is the moment when I realize how monumental undertaking this whole thing is. Am I really here, 4 000 km away from home waiting for MY sculpture to be positioned on the rocks? Exciting. Humbling. Amazing. Terrifying.
Luckily, there is not much time to think about it, as all of a sudden, there is lots to do.
First the skeleton needs to be stabilized.


145 ceramic triangles need to find their exact spot, and be bolted in....


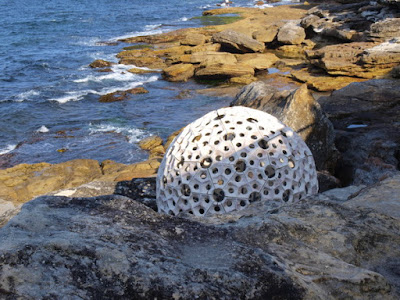


Wow, it is done! If you are in Sydney, I'll be lingering around on Thursday from about 10 am, and so will most of the artists present.
Come and say hello!


View of the improved and streamlined inside structure. It looks much better than the original.Recently I had a conversation with an artist painter about the ability to go back to previously "finished" work and re-paint sections or the whole work. This is just about the first time I was able to go back and change aspects of the work after it was finished. You can't do that with clay very often.


This is the spot where it is going:

Several hours later, boxes with the ceramic are lowered by crane:

Luckily, there is not much time to think about it, as all of a sudden, there is lots to do.
First the skeleton needs to be stabilized.

Then weighted down....
And than dressed up....
Emma is here to help, and so is my husband (behind the camera at the moment)


I could not choose the favourite vantage point. I think it looks good from all angles.


Come and say hello!
Friday, 13 May 2016
Drift
Set up in Mandurah.
Transport is so much easier with the ute than with a large trailer. And being able to drive all the way to the site makes it even better.


View of the improved and streamlined inside structure. It looks much better than the original.Recently I had a conversation with an artist painter about the ability to go back to previously "finished" work and re-paint sections or the whole work. This is just about the first time I was able to go back and change aspects of the work after it was finished. You can't do that with clay very often.

I really like this work. The cubes are made of burned timber.

Thank you City of Mandurah for awarding The Shape of Thought a Highly Commended award.
Wednesday, 25 May 2016
New homes
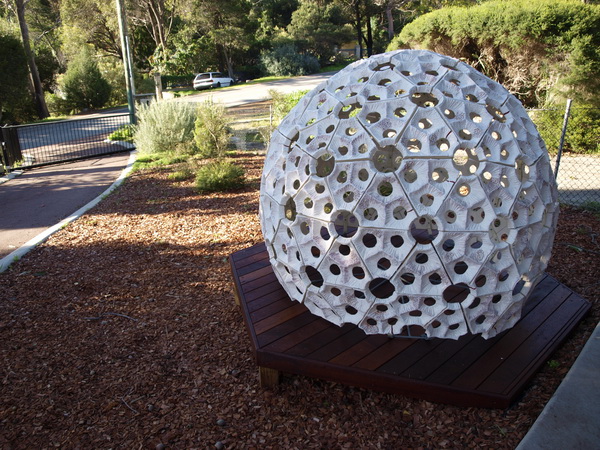
Both Intuitive Sense of Connection and Memories of the Ocean have permanent homes.
Intuitive Sense of Connection looks good in our garden on purpose made platform:


Intuitive Sense of Connection looks good in our garden on purpose made platform:

No comments:
Post a Comment